Showing posts with label Maya. Show all posts

Friday, 17 May 2013

Gunning for it

The model for my gun is already pretty much finished. The next stop was to create and apply textures to my model.
I used maya to create an ambient occlusion for my model. Normally I would have done all the pieces at once but as I am animating the gun I did the moving parts separately so they would not look unnatural with fixed shadows on them. This ao I could then use with my diffuse texture.
For my last project I created all textures by hand, for this I wanted to try using photography in conjunction with my layers to create a nice effect. I created a heavily scratched section of metal for the mechanical parts of the gun and wood for the handle. As the weapon is spose to be something my character may have salvaged from the apocalyptic wasteland, it suited it to be deteriorated to a certain extent.
This shows the gun with just the diffuse texture applied. My next step was to create normal and specular maps for the weapon. Crazy bump is a program I have never used before, however on trying it it works especially well. I used the information from my diffuse map to create the information for the other maps and them simply plugged them straight into maya. As you can see the finished effect is pretty pleasing.
Now I had the model looking how I wanted it was time to animate it. I used skeleton joints to help me with this. One for each of the moving parts, hammer, cylinder, trigger, and a parent one for the whole model. 
Something I found out was that if I altered the geometry I had to reset the joint it was applied to, otherwise it wont play cricket. Once all my joints were set up I began the actual animation process. This was pretty easy and suprisingly fun. It included the revolving cylinder, squeezing the trigger, pulling back the hammer and the movement of the gun due to recoil. I made a turntable with this animation playing and rendered a couple of images ready for my hand in folder. This pretty much concludes my gun model. Gee whiz.

Sunday, 28 April 2013

Using My Head

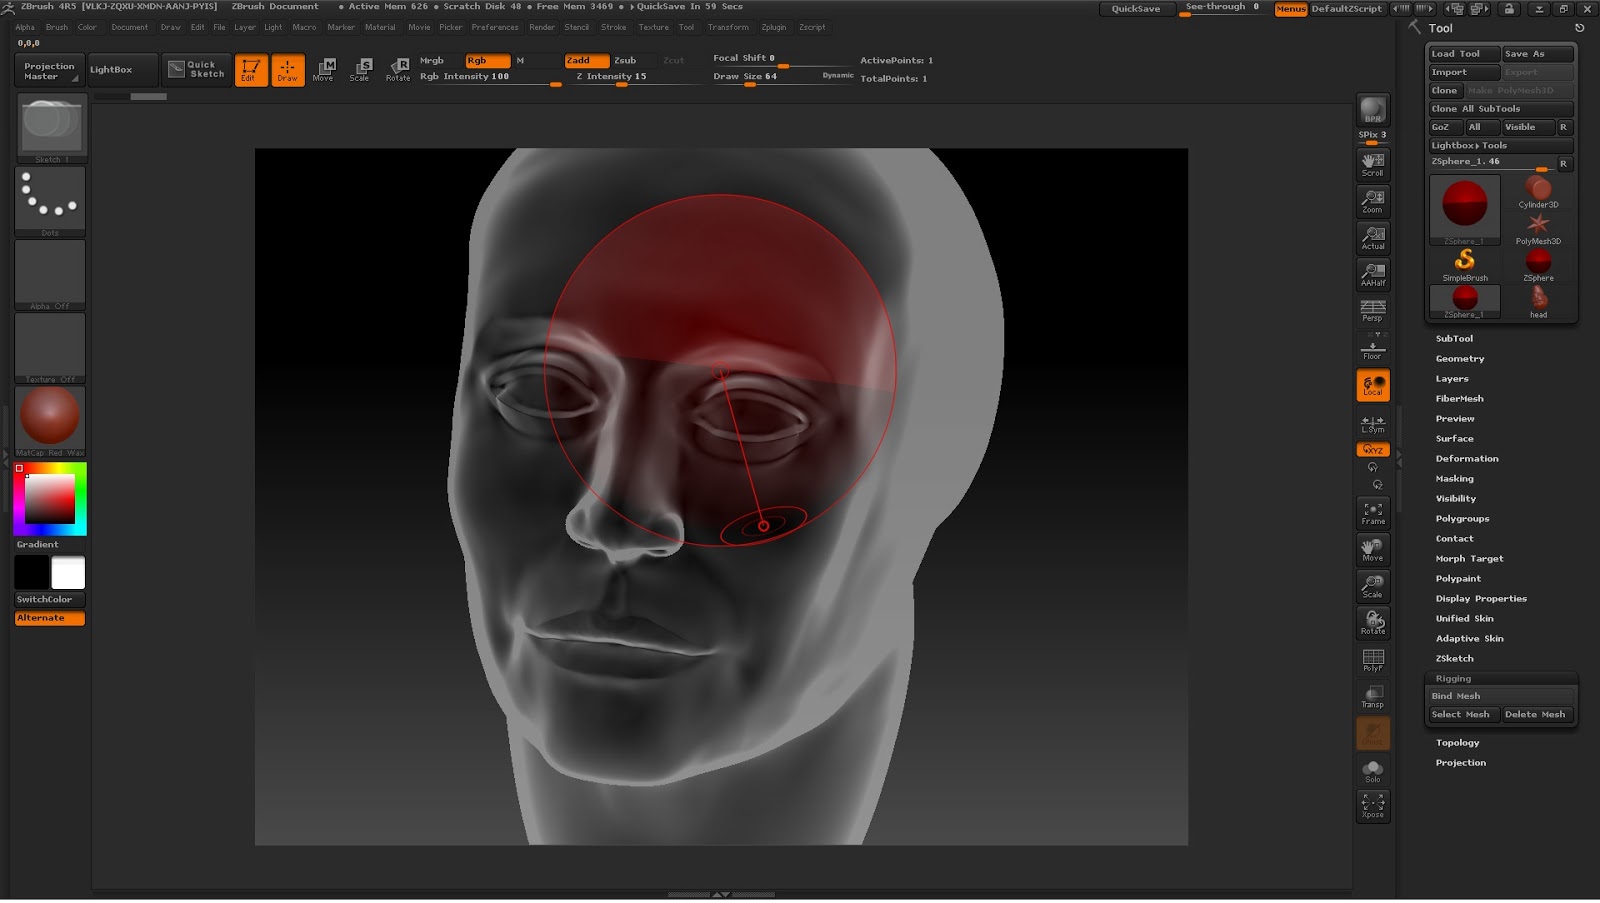
     Now that I have a basic body form it is time for me to start creating the head for my model. There are many different ways to go about this. I am starting mine in zbrush using a polysphere. I then masked part of this out and rotated that segment to create a basic skull shape as seen below.
I spent a lot of my time using the trim brushes in order to create the planes of the face. I used the move tool to stretch out a neck shape and to pull eyeballs from the socket. I have seen examples where the eyeballs have been made separately but this is not what I am doing for my model. Sculpting a face is not something I have done since last year so some areas of this were difficult to grasp, particularly since I was using a new program. However the body sculpting I did beforehand gave me some chance to warm up.
      Once I had the planes of the face laid out I could start sculpting in some of the curves of the face. I found the best thing to do with this process was just to keep working and coming back to it with a fresh look until I had refined a sculpt that I was happy with. I found it helpful to keep a bulk of magazines around my desk so I had a constant stream of references to compare my model to.
Once I was happy with the sculpting of my head I had to begin the process of retopologising the model. It was best to use the polypaint feature to paint the new topology first.
With this topology painted out I was then able to use it to guide my new topology. Firstly I loaded up a Zsphere from which it was then possible to rig to my original headsculpt and then edit the topology.
With the symmetry on to save me doing both sides I could create vertices where they appeared upon the topology map that I painted onto my sculpt.
When this was complete I was able to make a "skin" of this new topology which was then ready to be exported into Maya
Once my model was loaded up in Maya I created additional edge loops around the eyes and mouth. I then went on to create ears, shoulders, eyebrows and eyelashes for my model, which I will do further work to once it is imported back into Zbrush. My next job will be to finish up any sculpting work and then work on the texturing.


Tuesday, 16 April 2013

Blockman Begins

 
    The title is a pun...haha. This is where I start the process for my character model. Though the sculpting work will be done in Zbrush I will begin by building the basic form in Maya first, saving as an .obj and then importing. First off I was advised to look at the proportions of the character. People are generally considered about as tall as 7 lengths of their own head. Though in games and other media, to suggest a powerful or dominant character, particularly in the protagonist if this is appropriate, this scale can be increased. In this case I will be working with a model that is roughly eight heads tall. To prepare for this I have painted over an image of the default mudbox  male mesh to demonstrate.

      There are many ways to begin building a character's base mesh and I have experience in none of them. So for no other reason than because the book I has explains this method, I have opted for box modelling. I began with a cube and extruded segments down until the hips where I split it in two to make the legs.
 
All the way through the process I am making constant adjustments to the edges in order to create human proprtions. You can see that I have the mudbox human mesh in the background for just as a bit of a guide in this process.
 I actually learnt how to enable symmetry in Maya within this process which is not something I have have used before. This obviously makes things much easier except in a few places where symmetry with extrusions did not work
 I kept switching views to make sure I was not neglecting any of the form. I learnt within this process that pressing the "3" button activates the smoothing preview (pictured below) which transforms my boxy model to this more human shape. I also learnt that once my model was ready I could make this smoothing permanent via the "modify" toolbar, which prepared my mesh ready to be saved and imported in to Zbrush.
     Oh yeah, I had to activate one of the plugins in maya's preferences menu in order to save as an .obj because it wasnt on automatically- what a hullabaloo.

Monday, 1 April 2013

Gun modelling

     Using the book "Maya Studio Projects- Game Environments and Props" I have begun modelling the snubnose I picked in my earlier weapon designs. The guide is not fore exactly the same style of gun however this is good as I do not want to create an exact copy from a tutorial, so this will ensure I have an original design. I loaded my snub nose design in the background to help me achieve the basic dimensions once I began modelling.
The next step suggested that I use the boolean tool to create bullet shaped indentations in the cylinder, this is something we have been advised against in lectures at uni due to the fact that it often leaves messy geometry however I needed to follow the advice in the book so in this instance I decided to use it. I did however pay heed to the advice in the book and make sure the intersecting lines were not too close which should stop anything messing up.
      The next step was to create details for the front of the cylinder, this is for the high poly model, the lighting details for this will then be baked on to a lower poly game ready model. As it turned out this part of the gun was not visible once the model was complete so I have scrapped this detail in the long run however it still counts as practice so the time isn't completely wasted.
 I carried on modelling the rest of the gun there was nothing particularly unusual in the process at this point. I made sure to keep all the pieces separate as I will be animating them later so they need to be able to move separately, and to be honest at this point there is no good reason to start combining them anyway.
     The next step was a learning curve for me. Once I had the the high poly version of my gun modeled I could duplicate the separate parts, and by selecting the vertices with the move axis setting on normal, I could expand the shape so it encompasses the original.
     With these duplicate versions I was able to remove some of the gemometry which will be baked on instead. So I will have a lower poly model of the same gun, but with much more detail included.
The modelling of the gun is pretty much complete my next step is to try out the lighting and rendering in order to apply the required detail. Updates to follow

Thursday, 28 March 2013

Weapon designing

     I found using the silhouettes for the character design pretty useful so I decided to do the same for weapon design. Part of my learning agreement was to create at least one weapon for my character. Another book that I am currently reading: "Maya Studio Projects- Game Environments and Props" covers a gun modelling module.

 Here I can learn about high and low poly modelling, and also about some of the animation for the object. The object modeled is a hand gun whilst for obvious reason I do not wish to completely copy the process in the book, I wish for my own piece to look original, I would like it to have familiarity to the books example just so I can follow their process relatively easily. Therefore I will be modeling some variant of a one handed gun. My favourite guns in the fallout game are the mechanical ones as opposed to energy weapons (which fire laser beams etc.) therefor I have listed some of my favourite handguns that fall into this category.

10mm Pistol

Scopes


Revolver

Snub Nose

Sawn Off Shotgun

SMG


As with the characters I have made a page of different silhouettes that uses these sources as inspiration.


    I have decided to go with the snub nose design (top left) I like its small size and practicality, furthermore its firing mechanism is the same as that in the book I am using as a guide which will make it easier to follow. I will now begin the modelling process.

Thursday, 14 February 2013

Finishing up

I used today to put my assets into UDK. This was not without its issues and one of the first issues I hit seemed to be related to the trouble I had with the pasted wheels and tracks mentioned earlier in this blog. Whilst everything else worked fine importing these parts of the model resulted in this ungodly mess


This was obviously frustrating so late in the project, particularly as it had worked fine in my earlier exports to udk. I opted not to combine both tracks and their corresponding wheels and this seemed to prevent the problem.

    I began to create a specular map for my model. this is not the finest work I have produced on this project however time was of the essence and I was adamant that all the textures on my object should be my own. This I applied to certain parts of my tank, it took a while for me to get the settings right however it worked eventually.


Now that I had my object properly placed in a UDK level I wanted to add more to the scene. I spent some some time trying to create a new terrain and alter it however due to my unfamiliarity with the program this took a lot of time and I found I was not able to apply a material to it the same way as I had with my tank model. I decided to abandon this for now and instead just made a small enclosed area around the tank with some pre made UDK wall assets. I repeat. THE WALLS ARE READY MADE IN THE UDK AND PURELY THERE TO CONTRIBUTE TO THE SHORT FILM CLIP I WILL BE MAKING FOR THE LEVEL. I TOOK NO PART IN THE MAKING OF THESE WALL ASSETS. 


When I was learning about some of the UDK features in online tutorials I discovered some features like fog and lighting. Though this was not part of the project I felt I could try it out quickly so have created a very light foggy effect surrounding the tank area. I also learnt that I could move the players start point so it began in the tank area. Once this was done I added the collision meshes to my now completed UDK scene, then made a short video which has taken its sweet time to upload to youtube.


     I also went back into maya and created some nice mental ray images of my model as well as a couple of animated turntables just to document it outside of a game engine.

     It is pretty clear that I have not achieved everything I set out to do in the learning agreement. Whilst this is disappointing I am still very happy with the work I have done. Even though I am working into the final hours of this project window I am happy at least that I managed my time better than before and what I haven't achieved is not through lack of effort. My work in Maya has come on considerable since the start of this project and processes that would have taken me an age to complete beforehand I feel I could now achieve in a much shorter time frame. It is disappointing to not have been able to create the full scenery around my tank, or do more with texture, animate it or create the sequence trigger that I set out in my learning agreement. But I learnt a great deal already about game engines with which before I had no experience using.  Overall it would have been great to do more but I am still really pleased with what I have achieved.

Wednesday, 13 February 2013

Tank Texture

     I have found another great website which has helped me with my model. Here someone has made a tank the same model as mine which has been really helpful to look at.
More information on the model can be found here http://www.antos.ca/freebies.htm


I have now stuck in to the texturing process of my work. This has led to several different developments.

Problems
The first issue I ran in to luckily occurred whilst I was at Uni. Therefore Lothar was able to show me how to fix it. I am not sure how it happened but I had manage to parent a lot of the objects in my scene unintentionally. This led to problems when I tried to duplicate some of my textured objects but was relatively easy to fix.

The second issue came later. I had organised the different textured group objects into corresponding layers, When I was rearranging these however it became impossible to remove certain objects from a layer. I was able to fix this eventually just by deleting and recreating the layer.

Texturing
Throughout this project a lot of people have looked to the internet for textures to use on their model. I have spent a lot of time working on my tank in Maya and am really proud of how my abilities have developed because of this. In keeping with this it was really important to me that my textures should be completely made from scratch. This has taken up a lot of my time and has forced me to work further into the last week of my deadline then I had hoped for however it is still something I am glad I made the choice to do- and furthermore it has been another big learning curve for me within this project.
I found a really helpful tutorial online that was actually made for a tank model which can be found here: http://www.moddb.com/tutorials/all-texturing-tutorial. This gave a fantastic step by step guide to creating colour layers, metallic textures, variations in shades, chips and damage, plus dirt, grime, and mud layers. Applied to the model this creates a really pleasing effect.
     Decals
Another step mentioned in the tutorial includes decals. It is important that the model isn't completely bare of any insignia as this will look unnatural. It is also important that these details must have suffered similar wear to  the rest of the tank.

I looked at images like this to make sure I obtained the right kind of decals. In the end I opted for a minimal touch, just including the tank number and a small logo.

Though the tank will be the same colour pretty much all over, I have adjusted the shades slightly on the different texture layers so there is some variation.
It was important to take into account what part of the tank I am texturing and how its surface may vary. This image shows the wheels layer which I decided , as it was closer the the ground and the various terrain rubble, would be heavier affected by chips, scratch, mud and grime. Again it seems like a small difference but it really helps once the whole tank has been textured.

Ambient Occlusion

     As I was unwell during the week when our group received the lecture on ambient occlusions I had to catch up on this in my own time. This website http://www.3dtotal.com/tutorial/maya/video_tutorial_baking_ambient_occlusion/ambient_occlusion_01.php
was particularly useful when it came to going through the method which is actually fairly simple.
    
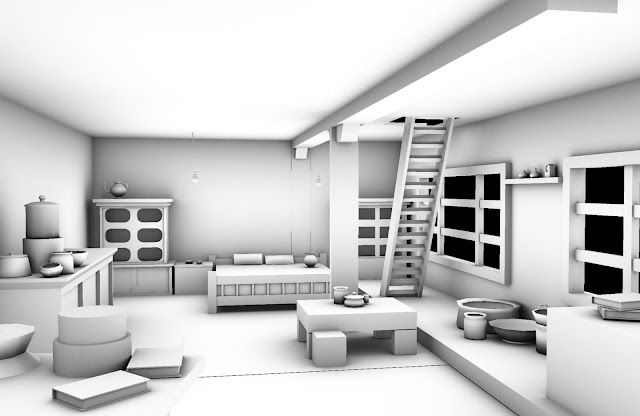
     An ambient occlusion applies a shadow effect to the model based on the ambient lighting, this can be applied to a texture map which should give it more depth when applied to a model. The next step for me was to try and apply this to my model.
This image is my model when the ambient occlusion shader is applied. Up to this point it works fine however I am hitting a problem when it comes to batch baking it. I believe, though am not completely certain, that based on the error message given, the problem is with some of the duplicated wheels which maya is "unable to locate".
    As I have spent a large amount of time and multiple attempts on this already I am going to work with my texturing anyway. I will look to fix this problem later on if I have time as I am concerned if I don't progress now I am going to run out of time.