Showing posts with label Apocalypse Character. Show all posts

Thursday, 16 May 2013

A Base To Call My Own

     I will be looking to have two examples of my model for hand in. The lower poly version that will be appearing in game, and the more aesthetic posed sculpt in Zbrush. For the latter I wanted to create a plinth in order to stand my character on.
     Interestingly Fallout contains little bobblehead statues in the game. Whilst I dont intend on making something identical it is fitting that my sculpt should be set up in a similar fashion. 
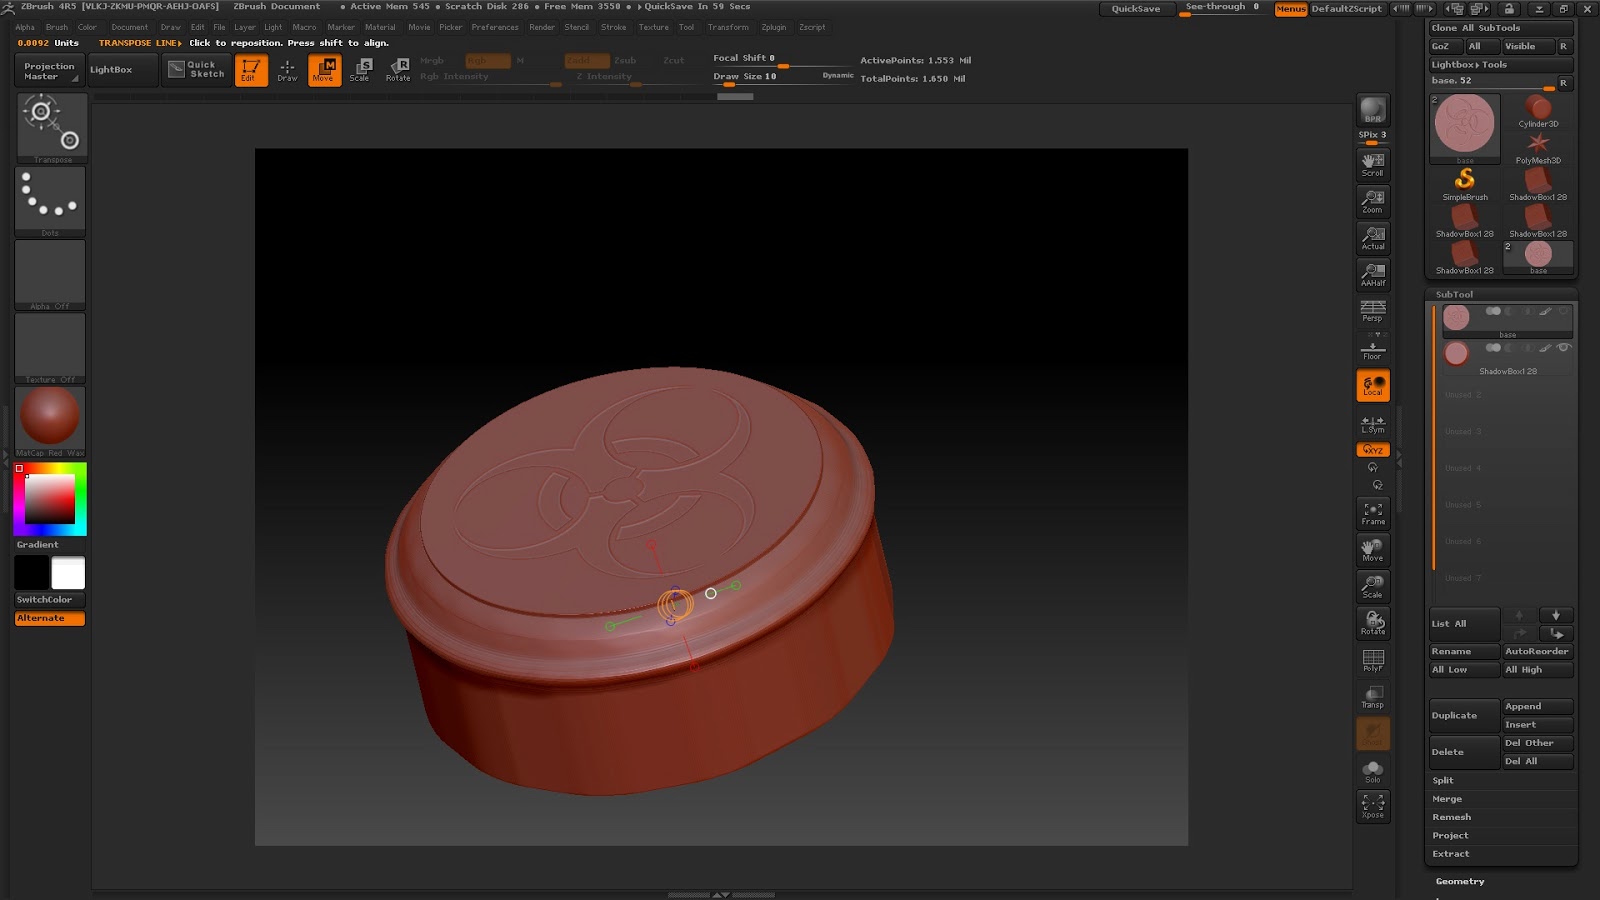
      Using the spotlight feature I was able to easily carve a biohazard symbol into the top of the base.
 Using rotational symmetry I was able to plane off some of the edges around the base and add a lip around the top.
  I used the slash brush to add damage to the base. This is in keeping with the kind of environment you tend to come across in the Fallout games. Again I used the spotlight tool this time to add a rocky surface texture to the base.
I positioned my model upon the base and then began posing it. I was then able to use the turntable feature in Zbrush and export directly as a .mov ready for my hand in folder. Using the guide in the book I had for this project, I attempted to add effects such as an outer glow, ambient occlusion and shadows to the model, however it does not seem to be working the way the guide stated. This is something I would like to get my head around for future work in Zbrush but with my deadline approaching I feel that I will have to settle for now with it as it stands.

Wednesday, 15 May 2013

Getting a-head

    I had a little trouble projecting the features of my original headsculpt onto the new topology I had created but this was just down to inexperience with Zbrush. After meeting with our tutor Mark I was able sort this quickly.
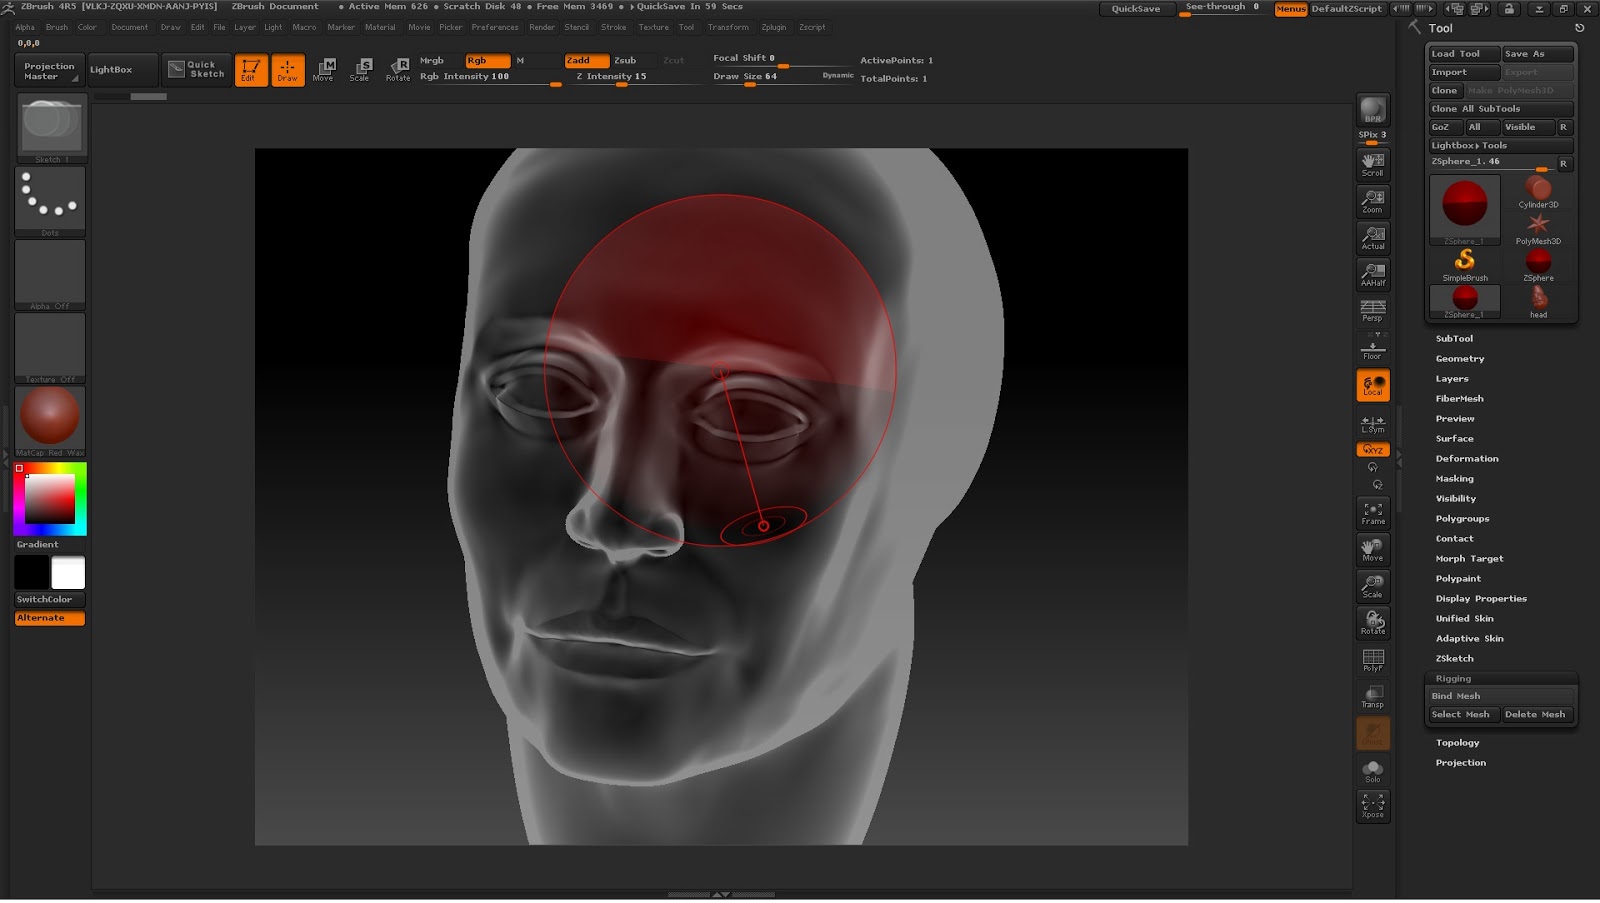
This picture shows my sculpting projected onto the new correct topology. My next step was to add in some of the skin detail. This I achieved by very lightly sculpting into the surface of the model. It is important to note how the shape and density of pores change over the face, the temple area is much loger and stretched then the nose for example. I also added slight wrinkles to the looser areas of skin such as the bags around the eyes.
I was then able to begin polypainting the face. I selected a colour that was a Caucasian skin tone. Using the standard brush with the painting (RGB) on and the sculpting off, I then selected the "colour stroke" and upped the colour variance. This will stop the painting looking too flat and unnatural. Once I had a bese coat of this colour I then added some additional colour to different areas of the the face. The area around the eyes for example has some yellow and purple tones running through is, meanwhile I added some redder tones to the lips, cheeks jawline and neck.

Once I had my head painted I was ready to add the head model to the clothes I had created earlier.

I now needed hands and some kind of undershirt to complete the model. As I liked the effect created on the jeans, I decided to also use spotlight in order to texture both these objects.
The gloves are SAP gloves. Basically ball bearings stitched into the leather in order to create a more devastating should you punch an opponent. I thought this would make for a cheap and obtainable form of protection for my character.

Now I have all the separate parts of my model set up I use the multimap exporter feature on Zbrush to create diffuse and normal maps for my character- as well as exporting all the parts as obj.s into maya. Here I hit another snag where the diffuse map for my head was not being created. After taking my model into uni to show the tutors we deduced that this was likely due to the fact that it was not taking information from all the layers I had set up. Now this is fixed I will need to set up the model with all the maps into maya.

Monday, 29 April 2013

Making the Clothes

     Now that I had the head sculpt sorted I needed to begin making the clothes for my character. This I achieved by masking out the general shape of the clothes on my original body sculpt whilst it was on its lowest geometry level. From here I was then able to do a mesh extraction which created a new model of that shape.
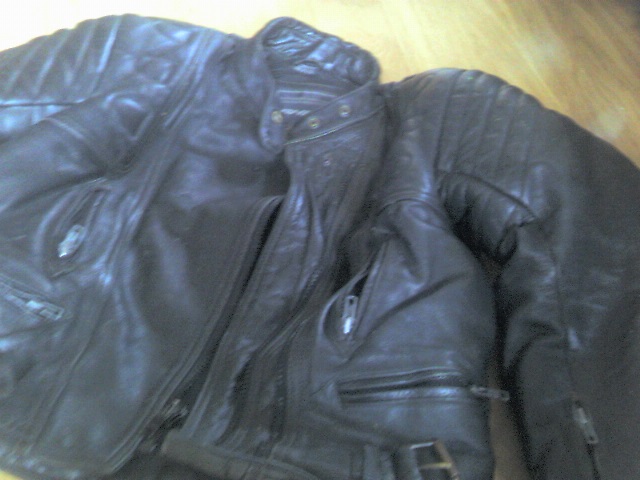
Next up I carved the shape of the seperate panels of the jacket into the model. I decided to go with the motorcycle jacket idea as it seems like a very quick, convenient makeshift armour for an inhabitant of the wasteland. I used my own motorbike jacket (below) as inspiration for the design.
The next step for me was to create the folds in the jacket. I began this process by using polypainting to draw out the folds first. With the models colour set to 50% grey I painted the high points of the folds in white, and the low points in black. This is shown below.
Unfortunately this is where I hit a problem with my work. Once I had finished the painting I checked my uvs and found that I had twice as much going on as I should have.
It seemed that I had somehow managed to double the geometry of my model. I found that the best way to fix this was export as an obj. into maya where I was able to select the doubled geometry face by face, as below, and then re-import back into Zbrush.
I would have been able to take this back into zbrush and apply the polypainting from before but I was not aware how to do this at the time so I ended up redoing this process. Once that was done I was able to use the inflate transformation to bring out the white polypaint areas into folds, and then sculpt these into a more realistic shape. I also used a standard brush with an alpha to add some leather looking surface texture to the model.
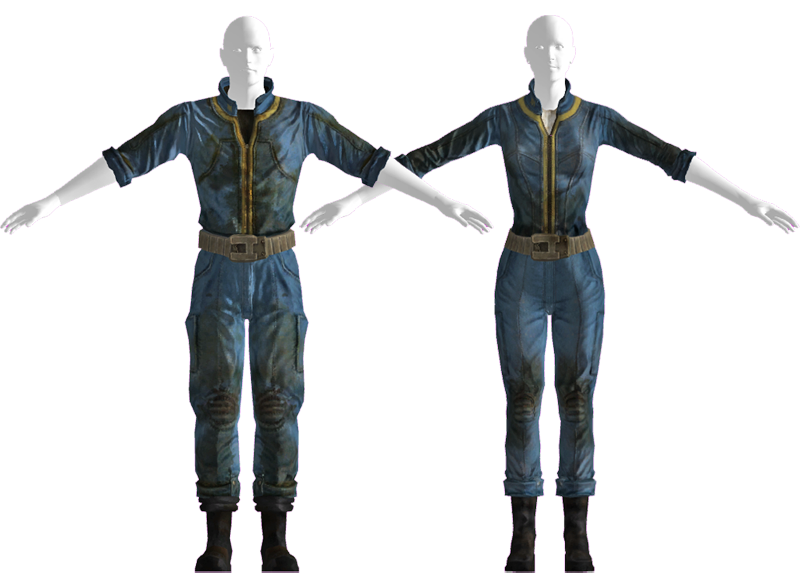
Once I had the sculpting as I wanted it I began painting the model. I used the blue and yellow "Fallout" jumpsuit colour to continue the suggestion that the character has emerged from one of the vaults.
I also used the move topology brush to open the jacket coller at the top
I now begin making the trousers for my character. The sculpting process is very similar to that of the jacket, I  polypainted high and low lights, inflated, then resculpted. The colour process for the jeans were different however. I took a photo my pair of jeans and used the spotlight feature in Zbrush to paint the details of the photo onto the sculpt.


I also added stitching detail to the model using a stitch brush with an alpha. The model needed to be divided up to about 6 million polys in order to achieve detail as small as this but it is definitely and effective touch


Next I went on to creating the boots for my character. Again I extracted the initial shape from my model. But in this case I then exported to Maya straight away where I flattened the bottom of the foot so it looked more like the sole of a shoe.
Once I had my model back in Zbrush, the process is almost identical to that of the jacket. I created the various folds, painted the colour onto the model, added leather texturing, and additional leather strips that wrap around the boots.

 This is as far as I have got with my work, as I was bringing my head sculpture back into Zbrush my computer crashed and is now not functioning, I aim to fix it as soon as possible in order to continue my work.


Sunday, 28 April 2013

Using My Head

     Now that I have a basic body form it is time for me to start creating the head for my model. There are many different ways to go about this. I am starting mine in zbrush using a polysphere. I then masked part of this out and rotated that segment to create a basic skull shape as seen below.
I spent a lot of my time using the trim brushes in order to create the planes of the face. I used the move tool to stretch out a neck shape and to pull eyeballs from the socket. I have seen examples where the eyeballs have been made separately but this is not what I am doing for my model. Sculpting a face is not something I have done since last year so some areas of this were difficult to grasp, particularly since I was using a new program. However the body sculpting I did beforehand gave me some chance to warm up.
      Once I had the planes of the face laid out I could start sculpting in some of the curves of the face. I found the best thing to do with this process was just to keep working and coming back to it with a fresh look until I had refined a sculpt that I was happy with. I found it helpful to keep a bulk of magazines around my desk so I had a constant stream of references to compare my model to.
Once I was happy with the sculpting of my head I had to begin the process of retopologising the model. It was best to use the polypaint feature to paint the new topology first.
With this topology painted out I was then able to use it to guide my new topology. Firstly I loaded up a Zsphere from which it was then possible to rig to my original headsculpt and then edit the topology.
With the symmetry on to save me doing both sides I could create vertices where they appeared upon the topology map that I painted onto my sculpt.
When this was complete I was able to make a "skin" of this new topology which was then ready to be exported into Maya
Once my model was loaded up in Maya I created additional edge loops around the eyes and mouth. I then went on to create ears, shoulders, eyebrows and eyelashes for my model, which I will do further work to once it is imported back into Zbrush. My next job will be to finish up any sculpting work and then work on the texturing.


Friday, 19 April 2013

Blockman Returns

     This post is going to ducument the sculpting work I have been doing with my character, carrying on from the last post I had just imported my model from maya to zbrush. Being new to the program it took me a while to learn some of the basic features eg. how to stay in 3D mode, models must be saved as tools etc. But once this was out of the way I was ready to go.
      I was advised that a good place to start with model was to use poly painting to point out the "bony landmarks". With these in place it becomes much easier to sculpt the form based upon its skeletal structure.
 
The main focus is on the parts of the skeleton that are going to have a prominent effect upon the shape of the human form. I used reference images of skeletons that I found in magazines such as "Men's Health" to guide me on the positioning of the skeleton.
    
      The main focus at this point is to split everything up into different planes, which will make it easier to sculpt on to them later. With this in mind I am mostly using the trim brushes which allow me to scrape away bulk or layer it up but still keep the surface flat.
           Once I had a basic form to work with I was able to use the "Ecorche" muscle and tendon brushes, obtained from the cd which accompanied the book I am using, and with this I was able to paint on the different different muscle groups. It pays to have some knowledge of the human anatomy at this point. I take part in sports such as powerlifting and boxing so I have some degree of information about the names and posititions of some of the different muscle groups, However I also used books to guide me on this.
      The image below shows the basic muscular sculpting on my model. I could spend longer on it trying to get it perfect however it will mostly be used to create the mesh for the different items of clothing my character will wear. Therefore at least for the time being I will be leaving it as it is in order to move on to the next stage.


Tuesday, 16 April 2013

Blockman Begins

 
    The title is a pun...haha. This is where I start the process for my character model. Though the sculpting work will be done in Zbrush I will begin by building the basic form in Maya first, saving as an .obj and then importing. First off I was advised to look at the proportions of the character. People are generally considered about as tall as 7 lengths of their own head. Though in games and other media, to suggest a powerful or dominant character, particularly in the protagonist if this is appropriate, this scale can be increased. In this case I will be working with a model that is roughly eight heads tall. To prepare for this I have painted over an image of the default mudbox  male mesh to demonstrate.

      There are many ways to begin building a character's base mesh and I have experience in none of them. So for no other reason than because the book I has explains this method, I have opted for box modelling. I began with a cube and extruded segments down until the hips where I split it in two to make the legs.
 
All the way through the process I am making constant adjustments to the edges in order to create human proprtions. You can see that I have the mudbox human mesh in the background for just as a bit of a guide in this process.
 I actually learnt how to enable symmetry in Maya within this process which is not something I have have used before. This obviously makes things much easier except in a few places where symmetry with extrusions did not work
 I kept switching views to make sure I was not neglecting any of the form. I learnt within this process that pressing the "3" button activates the smoothing preview (pictured below) which transforms my boxy model to this more human shape. I also learnt that once my model was ready I could make this smoothing permanent via the "modify" toolbar, which prepared my mesh ready to be saved and imported in to Zbrush.
     Oh yeah, I had to activate one of the plugins in maya's preferences menu in order to save as an .obj because it wasnt on automatically- what a hullabaloo.

Quick Costume Design

     I decided to make use of a spare twenty minutes I had to do a quick design for the clothing the character will be wearing, this is nothing special but it will function just to map out roughly what I want.
 
 
     I have a blue jumpsuit on my character which is the attire of "vault dwellers" in "Fallout" I have based the chest plates on the kind of armouring you would expect to see on a motorbike jacket, as shown below
 
 
    The character will wear practical footwear which would be essential for travesing the terrain of the nuclear wastelands. Whilst a metal covering, possibly sheet aluminum has been applied to the elbow and knee joints in order to offer them some protection as well as allowing the to be used offensively/defensively, either to shield or strike.
 
           I am not sure whether this will be my final design, I am in two minds as to whether the character should just wear a leather jacket for protection instead, but I will think on this and decide later.