Once I had decided to finish with the modeling I was advised to test the pieces out in UDK before I started work on anything else. The process for importing was pretty new to me in itself so I attended the Thursday tutorial with Lothar where we were shown how to do this. The process itself is pretty uncomplicated and just requires making an FBX export of the maya objects then opening this in UDK. We were also shown how to apply various maps to our object upon which I will go into more detail later.

The major problem I encountered was that segments of my model appeared to be missing. This is demonstrated in the picture below. The worse part of this was that it happened when I was supposed to be working at home for the day. I ended up coming into uni where Lothar was able to tell me where I had gone wrong.

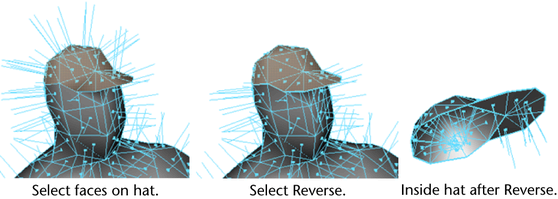
The problem was with my mesh in maya. Some of the face normals had inverted and this had made them appear invisible within UDK. All this required was to select the affected faces and click normals> reverse. The picture below demonstrates how this appears when an object has the face normals visible.
Once this was sorted I carried on importing the various parts of my meshes, and continued to clear up any further inverted normals. Once I was satisfied they were all functioning correctly I was happy to start focusing on fixing my uvs.


Another thing to bear in mind with the grouping of uvs was the pixel quality of the textures. Again this was brought up in our group crit where I was reminded to take into account what objects would use 1024x1024 textures, or 512x512 and so on. Obviously objects should be grouped with other objects that will be using the same. When it came to deciding how high quality the different parts should be the following site proved useful: http://freesdk.crydev.net/display/SDKDOC3/Asset+Guidelines
- "The texture size that you should use for an object is related to the .
amount of space that object will use on screen. For Crysis, Crytek aimed for a screen resolution of 800x600 pixels. Lets assume that the object will fill half the screens height at all time (600/2=300pixels); therefore, you should use at least a 256x256 screen ans 512x512 will be even better. The best case scenario will be to have 1 pixel on screen to represent one pixel in the texture. Of course this depends on how big the object is in all directions, as you cant reall translate the texture space in 2D directly to the amount of space it will use in 3D.
-Try to keep the texel ratios for all objects constant. This means that every object on screen uses roughly the same amount of texture pixels per meter. By doing this, you will ensure that all the objects have roughly the same sharpness on screen and that the textures dont look muddy
- Objects that are always on screen and at the same distance to the player (for example weapons) can use a higher texel ration in areas that are closest to the player (butt-stock, iron sights and the like)."
Due to the size of the tank, and the fact that the player will be able to study it relatively close up I decided the main body and turret would need to use a 1024x1024 map. meanwhile the other features could be smaller but I have not yet decide by how much.


I now have my uvs and objects all placed and grouped correctly so today I began creating my first texture. A photoshop network can be created with maya so I can continually update the image in PS and check how it suits my model.

This takes me up to date for now, updates to follow
No comments:
Post a Comment