Tuesday, 16 October 2012
New year
As usual slightly delayed posting on here. We are now back at uni for our second year and although the poor dedication to blogging may contradict this, I am determined to make this year more productive. We already have a main project set, the creation of a pitch and design doc for our own reinterpretation of a pre- existing game. In the first week of contextual studies we were also given a game genre to research and present. Examples of work relating to these projects to follow.
Sunday, 13 May 2012
A most relieved update. But its still not going right!
Ok so here's the score. I managed to get a friend on the course, namely Robin Silcock, to do the render views on her (working) version of maya. I managed to sort out my texture at the same time and eventually found a code that allowed me to do render views on my (broken) version of Maya. So I had working lights models and textures. The process distorted my door somehow along the way but i pinched an earlier copy so its all good.
 I kind of like it it took long enough.
The main issue now is that when I try to render my vid, it comes out particularly stuttery. I have attempted different cameras, angles, distances, frame rates, directions etc. with no real solution. Having looked it up on the internet and checked my file size, I think it may be that the file is excessively large, however I have no clue as to why this would be the case and how to solve it. So unless I am able to work something out I am simply picking the best version I can find. My project folder is also being submitted so it is thankfully possible to view the model outside of the video as well.
I have found a solution to the stuttering via windows movie maker, however I am struggling to make my video do the full turntable, it is not playing the same amount that it does before I import it.
I have even imported a what should be a full 360 rotation, only to find it barely does a quarter turn. Im sure the problem is fairly basic, and I intend to find out where I was going wrong, but for now I have spent a lot of time trying to fix this and seem to be getting nowhere so I will just have to submit the video as it comes. Luckily I do have my project folders so my work can at least be viewed properly that way.
With foresight I would have opened up the cave part of the door so there was more room for a camera in there, as you should technically not be able to see any of the outside part in this picture- within the game this would all be covered by rock structure.
As I used previously created images or textures within my work I now need to reference these:
http://fallout.wikia.com/wiki/Vault_101
Below are some additonal images I used to aid me with the creation of my door. They were of limited use.


I am a little frustrated as the end of my project is coming together, I feel I spent quite an amount of time modelling only to let it down when it came to rendering, however at the same time I feel I've learnt a lot within this project and look forward to taking those skills further.
Making a door the highs and lows.


This is the point where I started applying textures and things went wrong. Whilst the textures seemed fine on college computers, when I took my work home for some reason the one on the back wall becomes increasing blurry.

Sunday, 6 May 2012
Pick a door....HA its funny cause it's like what they might say in "The Matrix" or "Harry Potter"!!
One of the most iconic features of the fallout games is the entrances to the vaults. For this reason I have chosen to model a vault door. It is a strong representation of the game, and instantly identifiable to many gamers.

It makes little difference to the actual modelling, however I will be creating vault 101, Where the player grows up and starts off the game. It has very little difference to the the other intact vaults of the game save for the number on the door, and working control panel.


The picture above creates an important atmosphere that I think needs to be conveyed in my model. Whilst their overall condition isn't pretty, and the wasteland surrounding them is a mess, These doors still maintain a look of inpenetrable power, (they did survine nuclear warfare). So a careful balance is required between making the door look old and delapidated, whilst still fully functioning. I am also taking notice of the lighting in these scenes- This may be important when it comes to lighting my scene. To prepare me for this door I will proceed by making some drawings that will help me when it comes to modelling it in Maya.
It makes little difference to the actual modelling, however I will be creating vault 101, Where the player grows up and starts off the game. It has very little difference to the the other intact vaults of the game save for the number on the door, and working control panel.
The picture above creates an important atmosphere that I think needs to be conveyed in my model. Whilst their overall condition isn't pretty, and the wasteland surrounding them is a mess, These doors still maintain a look of inpenetrable power, (they did survine nuclear warfare). So a careful balance is required between making the door look old and delapidated, whilst still fully functioning. I am also taking notice of the lighting in these scenes- This may be important when it comes to lighting my scene. To prepare me for this door I will proceed by making some drawings that will help me when it comes to modelling it in Maya.
Sunday, 29 April 2012
As part of one of our contextual studies, a lady called Helen McCarthy, who has had a lot to do with Japanese media, came to one of our lectures. As part of this talk we were set an optional external project where we were required to create a game version of ourselves.
This is the start of my work upon this project
 I am quite a fan of boxing so I thought it would be quite cool if my character was a fighter in some kind of underground arena. I havn't quite decided just how much of a fantasy element I want to this character, therefor they may be additional inclusion of gauntlets, flame hands etc.
Helen McCarthy has, amongst other things, written a number of books- focusing particularly on anime. More information can be found here.
http://en.wikipedia.org/wiki/Helen_McCarthy
This is the start of my work upon this project

Helen McCarthy has, amongst other things, written a number of books- focusing particularly on anime. More information can be found here.
http://en.wikipedia.org/wiki/Helen_McCarthy
Wednesday, 25 April 2012
Architecture
The Companion Cube work discussed earlier in my blog has been preparing for the part of our project where we create our own replica of a door/window that we have found within a game.
The game I have chosen for this task is Fallout 3. This provides a fascinating example as the architecture contrasts so much. Though Fallout is set in the future, within the plot the earth's development became somewhat dysfunctional around the 50s when the wars started. This means throughout the game you consistenly see sci-fi technology couples with old fashioned advertising posters, sporting equipment and general decor. Another consideration has been that with environmental features such as burned out cars, constructions put together from scrap etc. These also have to reflect the 50's era as they are residue from that time, and seperate from the technological advances of the present day within the game. The video below is the intro of the game which I feel effectively sets the scene.
Below we see examples of the traditional style posters, and what these add visually to the game. As you can see they encompass the idea of the American Dream, and the marketing formats through posters and leaflets in that time.
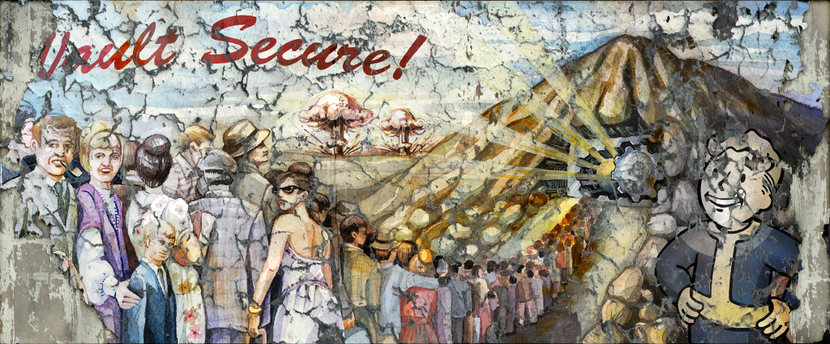

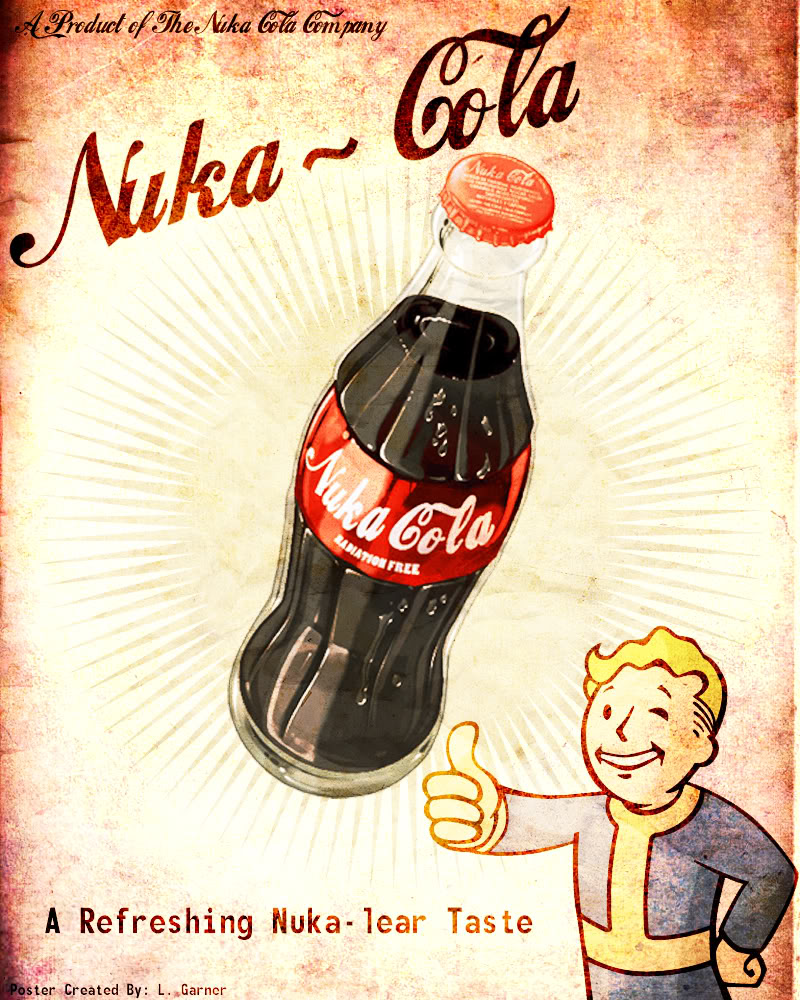
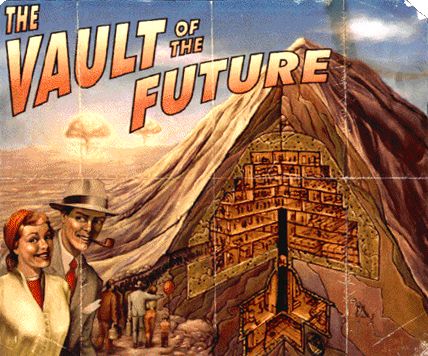


These images display an immaculate almost clinical quality- This also contrasts with the destruction of the wasteland as seen below.


Just to re-enforce the 50's theme, an example of a diner style wreckage. JUST LIKE THEY HAD IN "GREESE"!!!!!

AND AST BUT NOT LEAST AN ENTIRE ELVIS THEMED BUILDING (although technically this is from Fallout:New Vegas

More to come....
Wednesday, 18 April 2012
More Companion Cube
Here is some more of my joyous attempts to make one small part of the companion cube.
 Before carrying on with the process, something useful we learnt was to use one of the new layer buttons (bottom right of screen) to take any selected ovbjects and assign them to a new layer. This enabled me to have either parts of the cube visible/invisible at any given time. This can help to make the task less complicated, and helps prevent accidental selection of objects.

My next step was to bevel the edges of the shape using, suprisingly enough, the bevel tool. All that was required was to right click, opt for edge selection, select desired edge, select bevel option and kaboom!.. In honesty there was no kaboom,

I also had to use the merge vertices tool. This allowed me to take two corners and merge them into one. The process in maya give you a little red cross, much like a targeting reticle, in order to select these desired vertices.

As you see in the picture below, to further the shape I needed extra edges running through the middle of the shape. This was achieved by selecting the already existing central one and using the insert offset loop tool. This offset can then be adjusted as you wish, enabling me to create the change you can see below


As you see in the picture below, to further the shape I needed extra edges running through the middle of the shape. This was achieved by selecting the already existing central one and using the insert offset loop tool. This offset can then be adjusted as you wish, enabling me to create the change you can see below

Subscribe to:
Posts (Atom)